Tractor Forum banner

Huskee LT4200 Please Help!

22K views 24 replies 4 participants last post by  scheuvront1993  
#1 ·
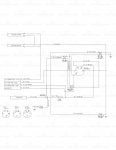
I'm sorry if this is in the wrong place but I have a Huskee LT4200 and I'm having an issue. The tractor has been used and abused, I've only been able to use one summer about 2 years ago. It was my father in laws before it was mine. I stopped mowing with it due to bent blades, but I continued using it to pull around a small trailer. It ran fine when it was parked last fall. I finally ordered the blades and bought a new battery for it. Once I installed the battery, I found that the key switch was not good. It had been hollowed out by my father in law, and I had always used a screw driver to start it, well it was too hollowed out by now and would no longer turn. I went to a parts store and bought a switch which turned out to be no good. I went to my local mower parts store and had them order me one.. well it is also the wrong switch. it fits in the hole, but it had two extra pins and such.. instead of trying to get the correct switch I have decided to just repin my connector to adapt to the switch. I will post a picture below, can someone please tell me what each wire does. I'm a good parts changer and intermediate mechanic but I suck at wiring diagrams so all help would be appreciated. Thank you all so much!
 
#3 ·
Will someone please help me with this!
Not only does the switch not work, but I can not get the thing to start! It ran great when parked, just like I mentioned above. I do not have any switch hooked up to it at all, I'm using jumper cables from the battery to the starter. It will crank but not start. I had it started for about 10 seconds yesterday and it shut back off, and would not start up again.
Let me explain what happened leading up to it actually starting. I thought perhaps the fuel filter was not allowing enough fuel to the carburetor, so using a straw I hooked the line straight up without the filter, and still nothing, for some reason I decided to put the fuel line directly into the carburetor., After this the fuel was just dumping in without even trying to start.. While trying to start this way it was literally overflowing out of the stop of the carb. I decided I should let it sit for a moment, lol.
I came back about 20 minuets later and it started after only a few seconds of cranking, but shut off shortly after. I have spark and am getting fuel, maybe not enough fuel? I found a blown fuse and fixed that problem, but still nothing.
 
#4 ·
Ok so start off with what you know...
Orange wire is the trigger wire for you starter solenoid. So get something and tag it.

Next you need to look for your ground wire. Easiest will be if you have a multimeter to check which one shorts to ground/chassis...
If you can find the ground/earth wire then you have two of the five sorted.

Next you will need to find the kill wire for the motor. This is the wire that's shorted to ground when you turn off the ignition and then shorts the ignition coils to stall the engine. There should be a single wire coming from the engine for this. unplug it and find a short between that unplugged wire and one of the unknown ones.
If you have lights on the tractor one of the wires is likely to supply power to the lights. How you can test this is take the one of the two wires left (after you have identified trigger, ground and stall wire). Make sure the secondary switch is switched on, and supply the wire one at a time with power. See if you have any response on the lights. Now if it's wire like my MTD then your lights will only run of the alternator when the engine is running.

If you have warning lights like I do one of the wires will supply electricity to the lights notifying of withes or pedals that should be engaged or pressed before you can start. Mine has a light for the clucth pedal if it's not depressed and a light for the PTO when it's engaged when you try to startup.

If you can find the first three wires of the bunch which is the most important then you can always follow the other two to figure out what they are for.
So try and find ground and stalling wire, trigger you have already sorted..

Post a picture of the tractor, then maybe we can get a better idea of what's what...
Will see if I can find a manual online.
 
#6 ·
Try to get the wiring sorted before you run it. Running it for long periods of time with no load on the charging circuit could damage you alternator...
If you do want to check if you can get it running then look for the kill wire coming from the magneto on the engine and unplug that. That way you know there's no switched or anything keeping it from running...
 
#7 ·
if you still have the base of the switch, check this against the attachment, the bottom of the switch should have letters to each terminal, you should be able to get going from this, there is a fix to installing the ignition switch, just a bit of fiddling and modifying.
 

Attachments

#8 ·
Hi everyone! Thank you very much for the replies!
So far I know the orange triggers the starter, the green is the ground, and there are two red wires coming from the 20 amp fuse under the battery. The two red wires coming from the fuse go into one connector, so one connector for both red wires. What is the fuse for exactly?
I am not very good at diagrams at all, I have done a little searching but I'm very bad at diagrams so it hasn't helped much.
As for getting it to actually start, have accomplished that. I found that if I dump fuel into the spark plug hole, it will start but die soon after. I believe it's not getting enough fuel, so I will be picking up a new filter soon.
Thank you for showing me that diagram, I do not have the old switch and as mentioned above I'm bad at diagrams, but I will sit down tomorrow to see if I can make heads or tails of it.
I am aware of what the letters stand for on the back of my new switch, I just need to match the wires up to the letter, lol.
I will try to get some good pictures tomorrow! Thanks again for all the help!
 
#9 ·
G'day Scheuvront1993

Save the drawing to desktop and you will be able to enlarge the drawing, after you save to desktop, double click on the icon for the drawing to open this, once opened you can scroll the mouse wheel to enlarge the drawing and by doing that you will be able to read the wiring colour code and this will help you sort out the switch.

does your new switch have the same letters as the drawing ??, would you be able to post a photo of the bottom of the switch ??.

while you are at it, a photo of the carby and float bowl will help too, there may be a fuel shut off solenoid fitted to the bottom of the bowl, and if there is no power going to this, then you wont be able to start the engine.
 
#10 ·
It would also help to have the actual model # of the tractor,from under the seat.
 
#11 ·
Hey everyone, sorry I haven't updated in a few days. I was at my local wally world the other day and they had an MTD rider sitting outside, I believe it was a snapper?
Anyhow, I noticed that it had the 3 position switch like my old switch. I also noticed it had the orange trigger wire. I pulled the switch out and snapped a few photos. I got home and matched everything up and wala! It cranks with the switch now, however, I still can not get the damn thing to run.
It will start right up if I dump gas in the carb. I searched for a shut off switch but I can't find one anywhere. If I pull the line off that goes to the carb gas pours out of it, so I know there's enough gas coming through there. I just put a new filter on it, if that means anything.
Thanks for all the help!
 
#16 ·
Yep,
That's the fuel shutoff solenoid,and also holds the float bowl in place.
It shuts off fuel flow through the main jet,when the key is off,to prevent backfire.
The solenoid is activated when 12 vdc,is applied.
One wire is +,and the other ground.
Remove it,and then see if you can move the shaft in,and out,with your fingers. It unscrews,like a bowl nut.
They get crusty,if there's been water in the fuel.
If that's the case,just spray it with PB Blaster ,and work it in and out,until it's free,and re-install it,and see if it runs,then.
 
#17 ·
Thank you FredM and jhngardner367! Your suggestions led me to believe that the sensor is just bad. The rod moves freely up and down, but I believe it is not working as it should.
I found that if I stick my finger over the hole that the sensor threads into, the mower starts up and idles. It idled fine until I decided to shut off, and it started back up fine. So I believe it is indeed a bad sensor. However, I managed to break a bunch of those fins off of the top of the motor. That's another story, but I was wondering what purpose do those things serve?I have all of the fins and can glue them back on if need be.
Also, do I have to have the shut off? Or can I just thread in a regular bowl nut and say screw it?
 
#18 ·
I can't say what you should do with regard to the fuel cutoff solenoid because of your laws regarding emissions etc., me, I would just cut off about 1/8" or so, so the needle doesn't enter the main jet and for all intents and purposes, the cut off is still attached to the carby, if you get my drift, you want to replace the solenoid with a bowl retaining nut, that is your call mate.

you could do another test if you have a digital multimeter, unplug the solenoid connector and place a probe into each receptacle in the lead on the switch side and turn the switch to the run position and see if you get a voltage reading, this will show if there is voltage going to the solenoid.

you are getting there
 
#19 ·
are the fins you mentioned on the flywheel on top of the motor ?, or fins from the cylinder area, if these are from the flywheel, their purpose is to generate airflow across the cylinder/s for cooling, and to glue these back on may cause the flywheel to become unbalanced, I am not sure what type of cement you could use for this, I feel the fins may let go at revs, if cylinder fins, if you have the right cement, this will be no bother, but you will need a cement that will withstand a lot of heat and also transfer the heat through the cement to the replaced fins.
 
#20 ·
Pictures would help.
 
#21 ·
Thanks everyone, I will try to get pictures soon. The fins are on the flywheel on top of the motor.
I removed the sensor today and I just broke the rod off and it actually ran! I drove it around the yard a short bit, I upped the speed a little and it was doing good. Then I tried to increase the idle... bad idea. When I increased the idle it bogged down and shut off. I tried to start it again and it will usually start but will then die again, I can't get it to idle now. Could it be flooding itself out without the rod?
A relative of my wife has a mower like mine he uses for parts so I may be able to snag the sensor real cheap from him!
 
#22 · (Edited)
how did you increase the idle ??, do you mean you increased the revs with the throttle control ??.

shortening the rod wont have any effect on the running of the engine, this is to stop run on when the ignition is turned off, the needle pops back into the main jet to block the entry of fuel, an emission control device and something else to make money from.
 
#23 ·
My mower has two levers, one on each side of the steering wheel. One increases or decreases the speed at which the mower physically travels, the other inceeases the speed at which the engine idles.
Anyhow, I put a new battery in it last night. I hit the switch, it started and bogged down a bit then died. It started right back up, I slowly increased the idle... And it ran! It sat and idled fine. I will take for a test drive around the yard tonight and if I'm lucky I'll be mowing my grass with it shortly.
 
#24 ·
Hello everyone! I came home from work today, hit the switch and it fired right up! I'm having absolutely no running issues with it now, I can adjust the idle as I please and it does just fine. I drove it around the yard, and even took my daughter for a ride and it's just fantastic.
However, I just installed new blades on it and I lowered the deck and engaged the blades, it bogged down and died after that, but I remembered that this has been an issue for a few years with the mower. It of course, started right up after that with no issues. I believe in the past is has been a lot of trial and error trying to get the blades to engage without killing the mower. It just takes some finagling. The small patch it did cut when the blades were engaged was beautiful! Nice even cut. Thanks everyone so far for all the help, and advice that has lead me to this point. The mower still needs a few finishing touches and such but it's at least usable again.
 
#25 ·
Hi again everyone, Just thought I would let ya'll know I actually cut my backyard with the rider this evening! It ran great! It would occasionally die but would start right back up again and go about it's merry way. I did the backyard without the top cover and such, I believe the top cover helps to cool the engine with the help of the fins on the flywheel, correct?
It didn't seem to get too hot but I only had it running about 20 minutes or so. After I was finished cutting the grass I let it cool for a while and tried to glue the fins back on, this turned out to be a miserable failure. I think there are enough fins left to keep the engine cool.
As I mentioned in the previous post, I still have a few things I need to get around to doing, number one being an oil change. I'm sure the oil has never been changed since new, and I really have no clue how old it is. But It's probably at least 6-8 years old. I also believe it needs a new belt, another thing I'm sure has never been changed.
I may not be on for a little while, unless something else comes up. Thank you all TREMENDOUSLY. Without your help the mower would probably still be stuck at point A.